Table of Contents
If you are a Chrome extension developer, you know that your extension’s success largely depends on its reach. One way to expand your user base is to make your extension accessible to non-English speaking users. That is where internationalization (i18n) comes in. Internationalization is the process of designing software so that it can be easily adapted to different languages and regions without altering the core code.
In the world, there are over 7168 languages spoken in the world today, with around half of them considered endangered or at risk of becoming extinct in the coming decades.
Source according to Ethnologue website
In this article, I will show you how to add internationalization (i18n) to your Chrome extension. So you as a beginner know how to make it an internationalization product. That with a simple and easy way to translate your Chrome extension content. The same way I did for all my Chrome extensions even the most popular Turn Off the Lights Chrome extension. No complexity here for a beginner developer.
What is i18n?
i18n stands for “internationalization”. The “i” and “n” in “i18n” represent the first and last letters of the word “internationalization”, respectively, and the number “18” represents the number of letters between them. “Internationalization” refers to the process of designing software or other products so that they can be easily adapted for use in different languages and cultures, without requiring major changes to the underlying code or structure. i18n is often used in software development to help ensure that products can be used by people around the world, regardless of their language or cultural background.
Why Add Internationalization (i18n) to Your Chrome Extension?
Before I dive into the how-to’s, let me talk about why internationalization is essential for your Chrome extension’s success.
- Reach a Global Audience: By making your extension available in different languages, you can reach a broader audience.
- Improve User Experience: Users are more likely to use a Chrome extension that is available in their native language. By providing a localized version of your extension, you can enhance the user experience.
- Increase Downloads: By reaching a broader audience, you can increase your extension’s downloads and improve its ranking in the Chrome Web Store.
Now that you know the benefits of internationalizing your Chrome extension, let us create your international Chrome extension.
How to Add Internationalization (i18n) to Your Chrome Extension:
Here are the step-by-step instructions for adding internationalization (i18n) to your Chrome extension.
Step 1: Create a Manifest File
The first step is to create a manifest file for your Chrome extension. The manifest file is a JSON file that contains important information about your extension, such as its name, version, description, and permissions.
You can also get the code from my previous Chrome extension template to build it further.
Step 2: Add i18n Messages to Your Manifest File
To add i18n support to your Chrome extension, you need to add messages to your manifest file that can be translated into different languages. These messages can include the name and description of your extension, as well as any other text that appears in your extension’s user interface.
That looks like this screenshot below:
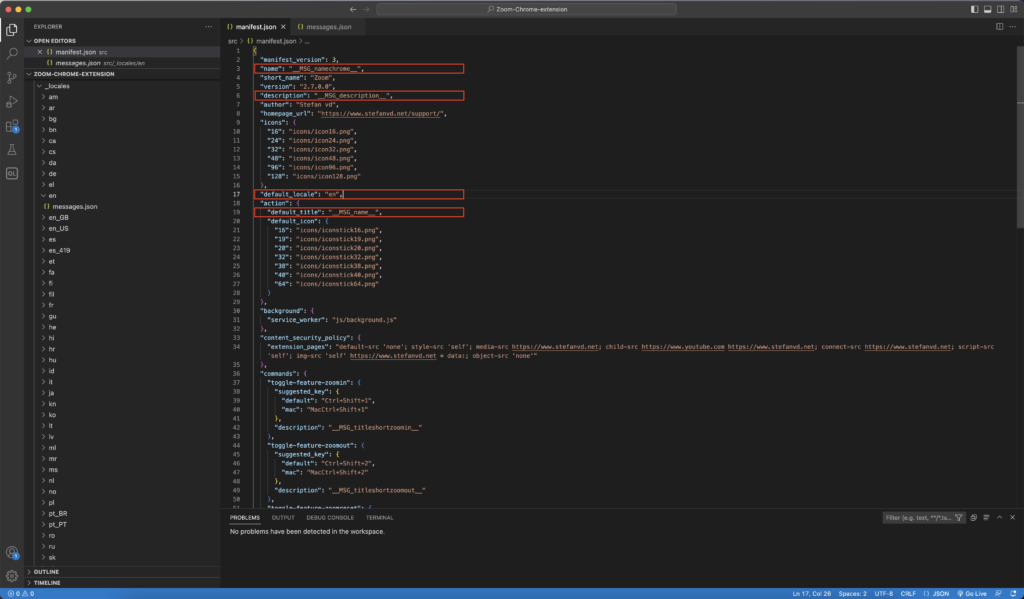
With this custom translation text for name, description, default title, and the default locale language code. That is written as follows:
"name": "__MSG_namechrome__",
"description": "__MSG_description__",
"default_locale": "en",
"action": {
"default_title": "__MSG_name__",
"default_icon": {
"16": "icons/iconstick16.png",
"19": "icons/iconstick19.png",
"20": "icons/iconstick20.png",
"32": "icons/iconstick32.png",
"38": "icons/iconstick38.png",
"40": "icons/iconstick40.png",
"64": "icons/iconstick64.png"
}
},
The first part “__MSG_” means that it gets the message from the message translation file. And the next part “namechrome”, is the name of the object item in the JSON file with the correct translation string (can be Dutch, French, Spanish, etc). And on end, it ends with the underscore symbol “__”.
Step 3: Create a “_locales” Folder
The next step is to create a “_locales” folder in your extension’s root directory. This folder will contain subfolders for each language you want to support. For example, if you want to support English and Dutch, you should create two subfolders: “_locales/en” and “_locales/nl“.
Chrome extension only supports 54 languages. So you are limited to this local language code:
| Locale code | Language (region) |
|---|---|
| ar | Arabic |
| am | Amharic |
| bg | Bulgarian |
| bn | Bengali |
| ca | Catalan |
| cs | Czech |
| da | Danish |
| de | German |
| el | Greek |
| en | English |
| en_GB | English (Great Britain) |
| en_US | English (USA) |
| es | Spanish |
| es_419 | Spanish (Latin America and Caribbean) |
| et | Estonian |
| fa | Persian |
| fi | Finnish |
| fil | Filipino |
| fr | French |
| gu | Gujarati |
| he | Hebrew |
| hi | Hindi |
| hr | Croatian |
| hu | Hungarian |
| id | Indonesian |
| it | Italian |
| ja | Japanese |
| kn | Kannada |
| ko | Korean |
| lt | Lithuanian |
| lv | Latvian |
| ml | Malayalam |
| mr | Marathi |
| ms | Malay |
| nl | Dutch |
| no | Norwegian |
| pl | Polish |
| pt_BR | Portuguese (Brazil) |
| pt_PT | Portuguese (Portugal) |
| ro | Romanian |
| ru | Russian |
| sk | Slovak |
| sl | Slovenian |
| sr | Serbian |
| sv | Swedish |
| sw | Swahili |
| ta | Tamil |
| te | Telugu |
| th | Thai |
| tr | Turkish |
| uk | Ukrainian |
| vi | Vietnamese |
| zh_CN | Chinese (China) |
| zh_TW | Chinese (Taiwan) |
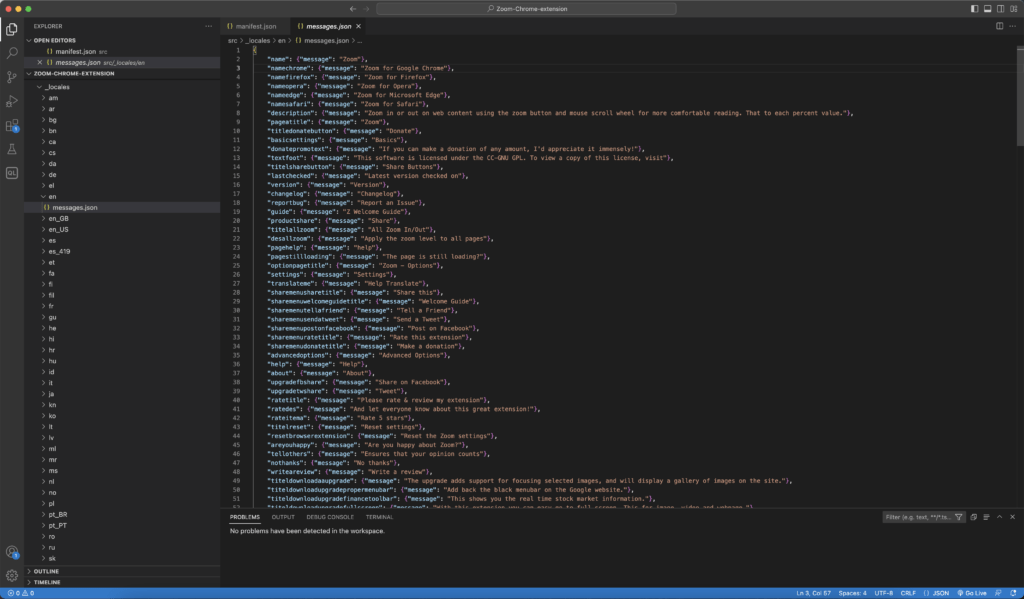
Step 4: Create a Messages File for Each Language
In each language subfolder, create a messages.json file. This file will contain the translations for the messages you added to your manifest file in Step 2.
Step 5: Translate Your Messages
Now it is time to translate your messages into the languages you want to support. You can use a translation service, such as Google Translate, to translate your messages automatically. However, it is important to note that automatic translations can sometimes be inaccurate, so it’s best to have a native speaker review your translations.
{
    "name": {"message": "Zoom"},
    "namechrome": {"message": "Zoom for Google Chrome"},
    "namefirefox": {"message": "Zoom for Firefox"},
    "nameopera": {"message": "Zoom for Opera"},
    "nameedge": {"message": "Zoom for Microsoft Edge"},
    "namesafari": {"message": "Zoom for Safari"},
    "description": {"message": "Zoom in or out on web content using the zoom button and mouse scroll wheel for more comfortable reading. That to each percent value."},
    "pageatitle": {"message": "Zoom"},
    "titledonatebutton": {"message": "Donate"},
    "basicsettings": {"message": "Basics"}
}
That looks like this screenshot below:
Replace Static text
When you wrote your HTML page, such as the Options page for your Chrome extension. One of the easy tricks to add the translated text is just searching to search for that data attribute with this name.
For example, you have this HTML code:
<h2 data-i18n="basicsettings"></h2>
<span data-i18n="pagestillloading"></span>
<button type="button" id="totldynpaper5" data-i18n="optionapply"></button>
And at the “data-i18n” attribute for the text that you want to translate. The text in the double quote is the name that can be found in your translated message.json file.
It works for all items such as header, span, buttons, etc. And with this JavaScript code, it will replace it automatically with the correct translate string:
//================================================
/*
Zoom
Zoom in or out on web content using the zoom button for more comfortable reading.
Copyright (C) 2023 Stefan vd
www.stefanvd.net
This program is free software; you can redistribute it and/or
modify it under the terms of the GNU General Public License
as published by the Free Software Foundation; either version 2
of the License, or (at your option) any later version.
This program is distributed in the hope that it will be useful,
but WITHOUT ANY WARRANTY; without even the implied warranty of
MERCHANTABILITY or FITNESS FOR A PARTICULAR PURPOSE.  See the
GNU General Public License for more details.
You should have received a copy of the GNU General Public License
along with this program; if not, write to the Free Software
Foundation, Inc., 51 Franklin Street, Fifth Floor, Boston, MA  02110-1301, USA.
To view a copy of this license, visit http://creativecommons.org/licenses/GPL/2.0/
*/
//================================================

// Search for data and translate it to current use language
var items = document.querySelectorAll("[data-i18n]");
var i;
var l = items.length;
for(i = 0; i < l; i++){
	var translation = chrome.i18n.getMessage(items[i].getAttribute("data-i18n"));
	if(items[i].value === "i18n"){
		items[i].value = translation;
	}else{
		items[i].innerText = translation;
	}
}
The code is coming from my official Zoom Chrome extension on GitHub.
Replace Dynamic text
If you have dynamic content, that adds a number or string. Then you can do it in this way:
"shareanalyticenergyWh": {
   "message": "I saved $energyvalue$ Wh thanks to Turn Off the Lights",
   "placeholders": {
          "energyvalue": {"content": "$1", "example": "123"}
   }
},
"titelenergy": {"message": "Energy"},
Everything between the dollar sign will be the number or string value that will show up in your translated string. That can be used in such as the content or injected script. With this code part:
var i18ntitelenergy = chrome.i18n.getMessage("titelenergy");
console.log("titelenergy=" + i18ntitelenergy);

shareenergytext = chrome.i18n.getMessage("shareanalyticenergyWh", "" + newsharewattvalue + "");
console.log("titelenergy=" + i18ntitelenergy);
Step 6: Load the Correct Language
Finally, you need to load the correct language based on the user’s preferences. You can use “chrome.i18n” API to retrieve the user’s preferred language and display the appropriate translation.
To learn a big Chrome extension project handles the big translation, you can view the Turn Off the Lights Open-Source browser extension at GitHub.
International Chrome extension FAQs
- Q: Do I need to translate all the text in my extension?
- A: No, you only need to translate the text that appears in your extension’s user interface. If you have any other text, such as documentation or error messages, you can provide them in English or another language that you are comfortable with. When for example, you have a Dutch translation with a part that does not have a string inside. Then it will use the English string.
- Q: Can I use automatic translation services to translate my messages?
- A: Yes, you can use automatic translation services to translate your messages. However, it is important to have a native speaker review your translations to ensure accuracy.
- Q: Can I add support for languages that use non-Latin characters?
- A: Yes, you can add support for languages that use non-Latin characters, such as Chinese, Japanese, or Arabic. Just make sure to save your messages files in UTF-8 encoding.
Addition resource
To learn more about Chrome Extension Manifest V3 APIs and continue to create a creative experience for the users, see these resources:
- Chromium Extension group
- Chrome developer documentation Chrome extension i18n
- Chromium Blog – Google Chrome Extension Internationalization
Conclusion
Adding internationalization (i18n) support to your Chrome extension can make it more accessible to users from different parts of the world. By following the steps outlined in this guide, you can create a more user-friendly experience for your extension’s users and expand your reach to a global audience.
Remember, internationalization is not just about translating your messages into different languages. It is also about making sure your extension can be adapted to different regions, cultures, and user preferences. By designing your extension with internationalization in mind, you can create a more inclusive and welcoming experience for all users.
So, take the time to add internationalization (i18n) support to your Chrome extension, and reap the benefits of a more global and diverse user base. I hope this guide has been helpful in getting you started on the path to internationalization. I hope you enjoyed it and learn more about how to make your first international Chrome extension. That I want to share this with the browser extension community. If you would like to support me, consider a small donation to my web community work. Happy internationalization work!