
Table of Contents

It is time that your Chrome extensions are migrating to Manifest V3. As Chrome Manifest V3 starts on 17 January 2023.
The best way to learn to write Chrome extension code (that is Manifest V3 ready) is by reading other developers’ code. So you as a beginner developer know how to solve problems. And be a problem solver in Manifest V3 development. Here is the overview of what I learned about getting my Chrome extensions migrated to Manifest V3.
Migrating to Manifest V3 useful tips for beginner developers
This article is for general Chrome extension developers who do not use the webRequest blocking (AdBlock – adblocker extension) in their Chrome extension code. So this is for the creative developers in the world that create great visual web experiences in the current tab, for the users. This article will give you an overview of Manifest V2 to the new Manifest V3 changes I have made to my Chrome extensions.
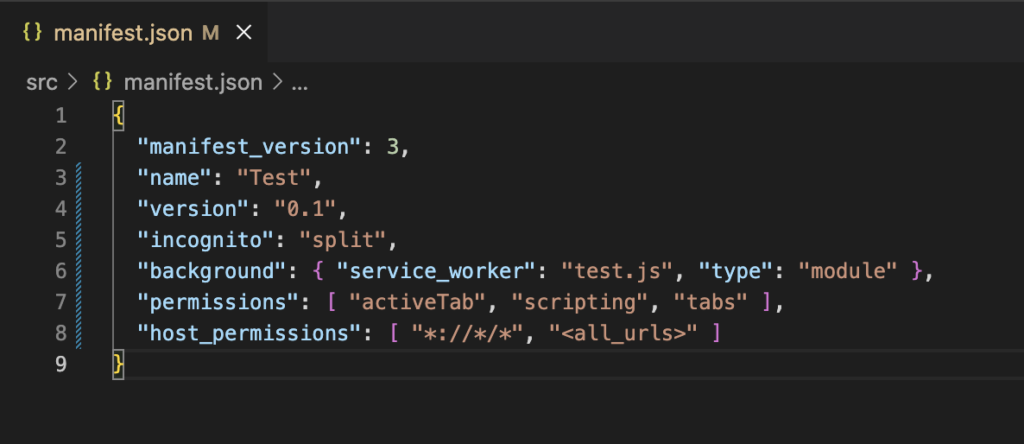
1. Do not use “activeTab” and “tabs” permission together
I see that many developers are still using both permissions in the manifest.json file. While ignoring the proper use of this permission. Because activeTab only works when your invoice the action when you click on the browser button (and context menu, shortcut key, and the Omnibox suggestion type) on the currently open tab. And with the use of tabs permission, you just increase the to read and access all tabs in your web browser. That includes the currently open tab, but also the tabs that are in the background on your Google Chrome web browser.
"permissions": ["activeTab", "storage", "tabs"]When migrating to Manifest V3, there is no reason to get this activeTab together with the tabs permission in your Chrome extension.
The best way for your users is to make it work in the currently active tab. That can be done by just using the Chrome activeTabs permission.
"permissions": ["activeTab", "storage", "scripting"]If you need access to all tabs to read sensitive properties such url, pendingUrl, title, and favIconUrl. Then you have to use the tabs permission. And with host permissions that give access to one or more hosts. Here is “<all_urls>” for the http, https, ws, wss, ftp, data, file, and chrome-extension on your device.
"permissions": ["tabs", "storage", "scripting"],
"host_permissions": ["<all_urls>"]
2. Do not use “window” in the service worker
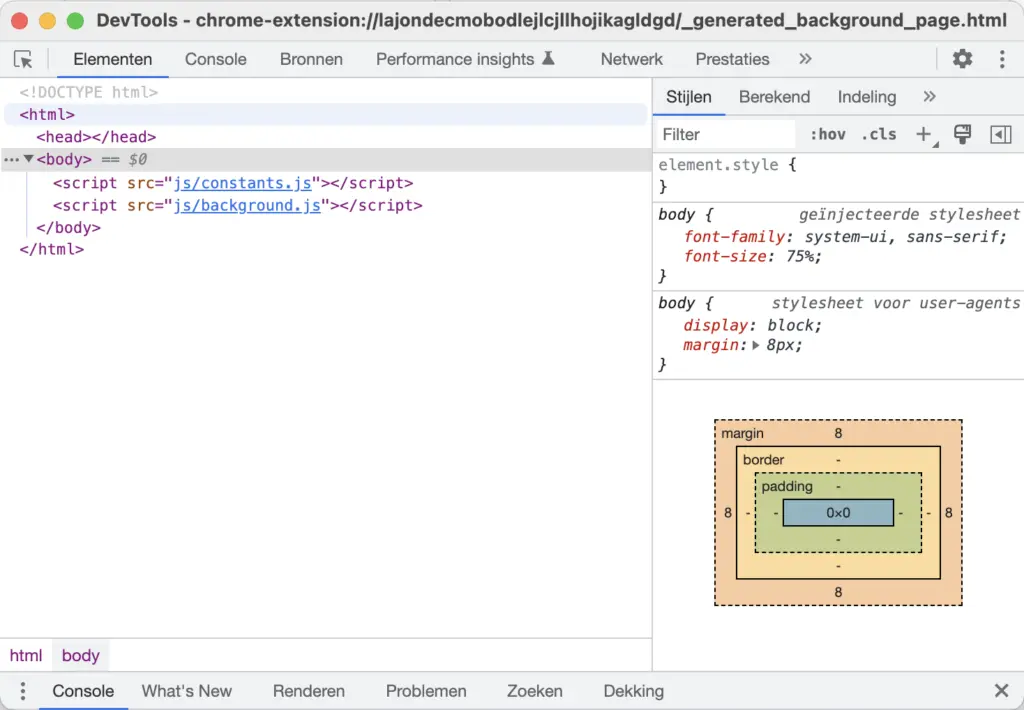
When migrating to Manifest V3, your Chrome extension will need to use a service worker because the events background page has ended. But that creates a number of limitations for this new worker.
DOM
The important change to a service worker is that you cannot access the DOM (Document Object Model ) such as the body, and head. Also, you cannot use the document.getElementById(“player”) to set or change the value. Or place an HTML <video> or <audio> in the background script.
Interval and timeout
In addition, service workers are terminated when not in use and restarted when necessary. So using a timer function will not be reliable.
Before in the Manifest V2 background.js event page, you can use the window.setInterval and window.setTimeout. This include also for the window.clearInterval, and window.clearTimeout.
// interval
function refreshTime() {
console.log("hello");
}

window.setInterval(refreshTime, 1000);

// time out
function WelcomeThere(){
console.log("welcome");
}

const myTimeout = window.setTimeout(WelcomeThere, 5000);

function myStopFunction() {
  window.clearTimeout(myTimeout);
}
Now in a Service worker, it will become just setInterval and setTimeout.
// interval
function refreshTime() {
console.log("hello");
}

setInterval(refreshTime, 1000);

// time out
function WelcomeThere(){
console.log("welcome");
}

const myTimeout = setTimeout(WelcomeThere, 5000);

function myStopFunction() {
   clearTimeout(myTimeout);
}
However, there is no guarantee that the setInterval will continue to work in the service worker code. So use the Chrome alarm for a reliable timekeeping function. And that needs extra permission in your manifest.json:
"permissions": ["activeTab", "storage", "alarms"]The use of the alarm in the service worker:
chrome.alarms.create("startTime", {when:Date.now() + 60*1000});

chrome.alarms.onAlarm.addListener(function(alarm){
     startTime();
});

function startTime(){
     // draw clock
}
An important note is that in the unpacked version (developer mode) there is no limit to how often the alarm can fire. But when you upload it to the Chrome Web Store, the alarm can not be set to less than 1 minute.
This is used in my Date Today Chrome extension.
Screen size
Also to get the current screen size is a part of the window.screen object. So you need to use the Chrome extension API chrome.system.display.getInfo to get the current screen work area size. And when you use this Chrome extension API, new permission needs to be added in your manifest.json to capture the screen size.
permissions": ["tabs", "storage", "system.display"]Note: Currently, there is a bug that does not provide the correct screen size. See this Chromium bug report 1303129.
localStorage
There is no access to the local storage window.localstorage in the service worker, for that you need the chrome.storage.local or chrome.storage.sync API.
3. Use of Constant value in the background service worker
Before using the event background page, you can add many JavaScript files in the header as in one HTML document. Now with the service worker that is not possible. However, you can now import the script into a single background server worker.
Here is an example of how to do it:
// Importing the constants
importScripts("constants.js");
This is used in my Turn Off the Lights Chrome extension.
4. Injecting a script needs permission now
When migrating to Manifest V3, additional permission is required. Now to run a script, you need to add this “scripting” permission. Since most developers should add this permission “scripting” to their Chrome extension. You can use the chrome.scripting API to inject JavaScript and CSS into websites. Before you can run the code with it without additional permission.
Manifest V2:
chrome.tabs.executeScript(tabs.id, { file: "js/print.js" }Manifest V3:
chrome.scripting.executeScript({ target: {tabId: tab.id}, files: ["js/print.js"] });This is used in my Print Chrome extension.
5. Use not inline JavaScript code but files or functions
No remote JavaScript
You cannot use external JavaScript files when migrating to Manifest V3. All JavaScript files must be contained in the extension folder.
A new way of injecting scripts
There is a new and different way of injecting script into the current web page. Injecting the script and its parameters can be done from a file or function.
To load your custom script file:
chrome.scripting.executeScript({
   target: {tabId: tabId},
   files: ["js/zoom.js"],
   injectImmediately: true
});
To load custom code from this same JavaScript document:
chrome.scripting.executeScript({
   target: {tabId: tab.id},
   func: codebodyzoom,
   args: [b]
});

function codebodyzoom(b){
   document.body.style.zoom = b;
}
This is used in my Zoom Chrome extension.
6. Change is important but Changelog too
It is also important to document what you have changed in your code, that to be open and transparent for you and the users that are using your Chrome extension. If you use GitHub, you can write for each release the information on what is changed. If your code is not Open-Source, then provide a link to a web page with that information that includes the version number, date, and what was updated.
Clean up your not necessary files
So developers use GitHub but try to add also the “.gitignore” file so that no other necessary files will be not there for the final distribution. You can use my free and Open-Source Chrome extension template (available on GitHub) that does all the job for you.
7. Context menu detection
Use function detection to check if the Chrome extension API is available for that platform. Because some platforms that support Chrome extensions will not support a context menu on that device. For example the mobile Safari web browser on iOS and iPadOS (and maybe Android soon).
if(chrome.contextMenus){
   var contextspage = ["page"];
   menupage = chrome.contextMenus.create({"title": pagetitle, "type":"normal", "id": "fspage", "contexts":contextspage});
}else{
   // web browser support this not
}
This is used in my Full Screen Chrome extension.
8. Use “chrome.runtime” and not “chrome.extension”
If you want to retrieve an item, do not this code anymore chrome.extension.getURL(url) but chrome.runtime.getURL(url). And to protect privacy, enable sure the dynamic URL attribute. That prevents others from tracking you that you have installed that Chome extension on your device.
Manifest V3 manifest.json file:
"web_accessible_resources": [{
    "resources": [ "images/slice1.png",
    "images/slice2.png",
    "images/slice3.png",
    "images/slice4.png",
    "images/slice5.png",
    "images/slice6.png",
    "css/body.css"],
    "matches": ["<all_urls>"],
    "use_dynamic_url": true
  }]
Content script:
document.getElementById("backgroundimagesource").value = chrome.runtime.getURL('/images/slice1.png');This is used in my Proper Menubar Chrome extension.
9. Non-documented Chrome extension changed too
When converting to this new Manifest (migrating to Manifest V3), there is a new Chrome extension API name for Manifest V3. Here is an overview of which name has been changed:
chrome.extension.sendRequest() => chrome.runtime.sendMessage()
chrome.extension.onRequest => chrome.runtime.onMessage
chrome.extension.onRequestExternal => chrome.runtime.onMessageExternal
chrome.extension.lastError => chrome.runtime.lastError
chrome.extension.getURL() => chrome.runtime.getURL()
chrome.extension.getExtensionTabs() => chrome.extension.getViews()
chrome.tabs.Tab.selected => chrome.tabs.query({active: true})
chrome.tabs.sendRequest() => chrome.runtime.runtime.sendMessage()
chrome.tabs.getSelected() => chrome.tabs.query({active: true})
chrome.tabs.getAllInWindow() => chrome.tabs.query({currentWindow: true})
chrome.tabs.onSelectionChanged => chrome.tabs.onActivated()
chrome.tabs.onActiveChanged => chrome.tabs.onActivated()
chrome.tabs.onHighlightChanged => chrome.tabs.onHighlighted
As well as the undocumented:
chrome.extension.sendMessage() => chrome.runtime.sendMessage()
chrome.extension.connect() => chrome.runtime.connect()
chrome.extension.onConnect => chrome.runtime.onConnect
chrome.extension.onMessage => chrome.runtime.onMessage
10. Check API is on the stable release
Always perform a function check in your Chrome. Because Manifest V3 is stable as Google said, but it is possible that not all features are available in the stable Chrome version that most everyday web browsers use these days.
For example, chrome.action.openpopup() API. It works only in the Chrome beta and the dev channel. And not in the Chrome stable version, see Chromium bug report 1245093.
Addition resource
To learn more about Chrome extension APIs and continue to create a creative experience for the users, see these resources:
Final remarks
My previous post for a good development environment for building a Chrome extension Manifest V3 has a good start with removing the unnecessary “.DS_Store” files and “node_modules” folder. And with the plugin to write your seamless and concisely JSON, HTML, JavaScript, and CSS code. That with automatically pretty your CSS code. And one command to distribute your Chrome extension to a zip file.
In this article, you have learned about your Chrome extension migrating to Manifest V3, by using the correct permission in your Chrome extension and the use of a service worker. And the use of the new Chrome extension API names. Now you can develop and create amazing experiences in your web browser. I hope you enjoyed reading this post. If you would like to support me, consider a small donation to my web community work.